Setup Jupyter Notebook with Python 3 on Ubuntu18.04
Step 1 - Set Up Python
1 | $ sudo apt update |
2 | $ sudo apt install python3-pip python3-dev |
Step 2 - Create a Python Virtual Environment
Upgrade pip and install the package by typing:
1 | $ sudo -H pip3 install --upgrade pip |
2 | $ sudo -H pip3 install virtualenv |
The -H flag ensures that the security policy sets the home environment variable to the home directory of the target user.
With virtualenv installed, we can start forming our environment. Create and move into a directory where we can keep our project files. We’ll call this meow_Jupyter_dir, but you should use a name that is meaningful for you and what you’re working on.
1 | $ mkdir ~/meow_Jupyter_dir |
2 | $ cd ~/meow_Jupyter_dir |
Within the project directory, we’ll create a Python virtual environment. For the purpose of this tutorial, we’ll call it meow_Jupyter_env but you should call it something that is relevant to your project.
1 | $ virtualenv meow_Jupyter_env |
This will create a directory called meow_Jupyter_env within your /meow_Jupyter_dir directory. Inside, it will install a local version of Python and a local version of pip. We can use this to install and configure an isolated Python environment for Jupyter.
Before we install Jupyter, we need to activate the virtual environment. You can do that by typing:
1 | $ source meow_project_env/bin/activate |
Your prompt should change to indicate that you are now operating within a Python virtual environment. It will look something like this: (meow_Jupyter_env)user@host:~/meow_Jupyter_dir$.
You’re now ready to install Jupyter into this virtual environment.
Step3 - Install Jupyter
With your virtual environment active, install Jupyter with the local instance of pip.
1 | $ pip install jupyter |
Step4 - Run Jupyter Notebook
You now have everything you need to run Jupyter Notebook! To run it, execute the following command:
1 | (meow_Jupyter_env)user@host:~/meow_Jupyter_dir$ jupyter notebook |
A log of the activities of the Jupyter Notebook will be printed to the terminal. When you run Jupyter Notebook, it runs on a specific port number. The first Notebook you run will usually use port 8888. To check the specific port number Jupyter Notebook is running on, refer to the output of the command used to start it:
1 | [I 22:22:01.655 NotebookApp] Serving notebooks from local directory: /home/meow/meow_Jupyter_dir |
2 | [I 22:22:01.655 NotebookApp] The Jupyter Notebook is running at: |
3 | [I 22:22:01.655 NotebookApp] http://localhost:8888/?token=bd9fb1ffea853311666052bd331268f3cb7392ea50e0ce4f |
4 | [I 22:22:01.655 NotebookApp] or http://127.0.0.1:8888/?token=bd9fb1ffea853311666052bd331268f3cb7392ea50e0ce4f |
5 | [I 22:22:01.655 NotebookApp] Use Control-C to stop this server and shut down all kernels (twice to skip confirmation). |
6 | [C 22:22:01.659 NotebookApp] |
7 | |
8 | To access the notebook, open this file in a browser: |
9 | file:///home/meow/.local/share/jupyter/runtime/nbserver-26312-open.html |
10 | Or copy and paste one of these URLs: |
11 | http://localhost:8888/?token=bd9fb1ffea853311666052bd331268f3cb7392ea50e0ce4f |
12 | or http://127.0.0.1:8888/?token=bd9fb1ffea853311666052bd331268f3cb7392ea50e0ce4f |
If you are running Jupyter Notebook on a local computer (not on a server), you can navigate to the displayed URL to connect to Jupyter Notebook. If you are running Jupyter Notebook on a server, you will need to connect to the server using SSH tunneling as outlined in the next section.
At this point, you can keep the SSH connection open and keep Jupyter Notebook running or you can exit the app and re-run it once you set up SSH tunneling. Let’s choose to stop the Jupyter Notebook process. We will run it again once we have SSH tunneling set up. To stop the Jupyter Notebook process, press CTRL+C, type Y, and then ENTER to confirm.
We’ll now set up an SSH tunnel so that we can access the Notebook.
Step 5 - Connect to the Server Using SSH Tunneling
In this section we will learn how to connect to the Jupyter Notebook web interface using SSH tunneling. Since Jupyter Notebook will run on a specific port on the server (such as :8888, :8889 etc.), SSH tunneling enables you to connect to the server’s port securely.
The next two subsections describe how to create an SSH tunnel from 1) a Mac or Linux, and 2) Windows. Please refer to the subsection for your local computer.
SSH Tunneling with a Mac or Linux
If you are using a Mac or Linux, the steps for creating an SSH tunnel are similar to using SSH to log in to your remote server, except that there are additional parameters in the ssh command. This subsection will outline the additional parameters needed in the ssh command to tunnel successfully.
SSH tunneling can be done by running the following SSH command in a new local terminal window:
1 | $ssh -L 8000:localhost:8888 your_server_username@your_server_ip |
if sometimes denied, need to open ssh port using ufw command:
1 | $sudo ufw allow ssh |
or
1 | $sudo ufw allow 22/tcp |
if running ssh on TCP port #2222, enter:
1 | $sudo ufw allow 2222/tcp |
wanna see the current status of the firewall:
1 | $sudo ufw status verbose |
The ssh command opens an SSH connection, but -L specifies that the given port on the local (client) host is to be forwarded to the given host and port on the remote side (server). This means that whatever is running on the second port number (e.g. 8888) on the server will appear on the first port number (e.g. 8000) on your local computer.
Optionally change port 8888 to one of your choosing to avoid using a port already in use by another process.
server_username is your username (e.g. meow) on the server which you created and your_server_ip is the IP address of your server.
If no error shows up after running the ssh -L command, you can move into your programming environment and run Jupyter Notebook:
1 | $ (meow_Jupyter_env)user@host:~/meow_Jupyter_dir$ jupyter notebook |
You’ll receive output with a URL. From a web browser on your local machine, open the Jupyter Notebook web interface with the URL that starts with http://localhost:8888. Ensure that the token number is included, or enter the token number string when prompted at http://localhost:8888.
SSH Tunneling with Windows and Putty
If you are using Windows, you can create an SSH tunnel using Putty.
First, enter the server URL or IP address as the hostname as shown:

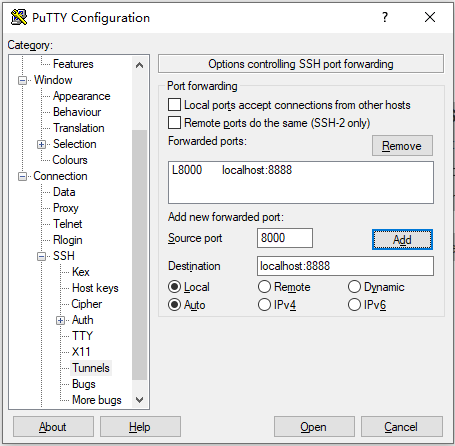
Next, click SSH on the bottom of the left pane to expand the menu, and then click Tunnels. Enter the local port number you want to use to access Jupyter on your local machine. Choose 8000 or greater to avoid ports used by other services, and set the destination as localhost:8888 where :8888 is the number of the port that Jupyter Notebook is running on.
Now click the Add button, and the ports should appear in the Forwarded ports list:
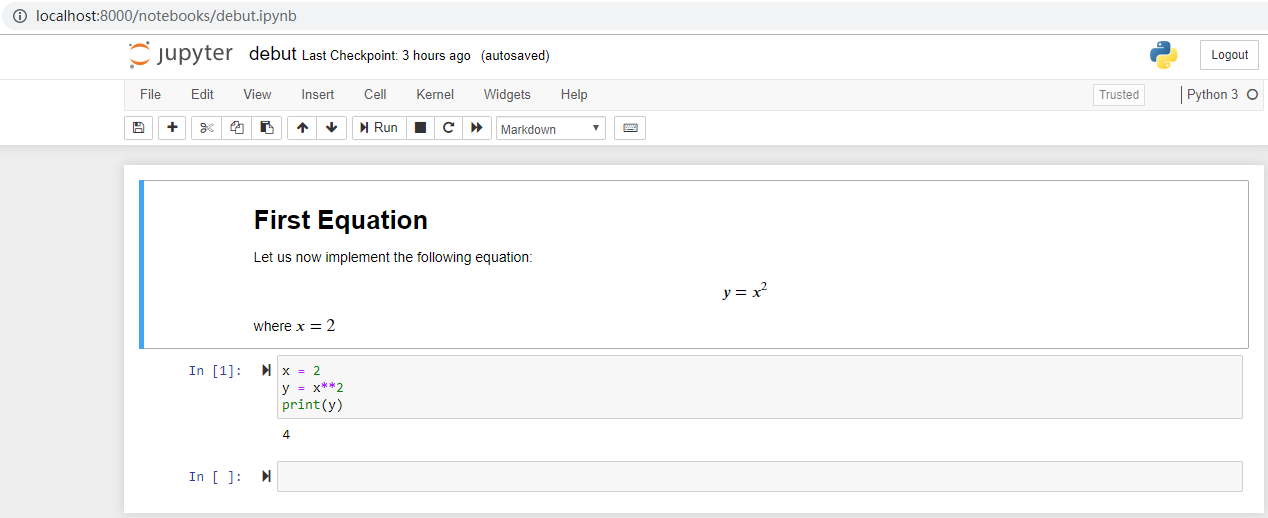
Finally, click the Open button to connect to the server via SSH and tunnel the desired ports. Navigate to http://localhost:8000 (or whatever port you chose) in a web browser to connect to Jupyter Notebook running on the server. Ensure that the token number is included, or enter the token number string when prompted at http://localhost:8000.
To check the token number, in the local machine’s command line, navigate to the folder where jupyter notebook installed (be careful if installed in the virtual environment), then type:
1 | $juypter notebook list |
and copy the token number.
Step 6 - Using Jupyter Notebook
Done!